5.21.2016

Raffia Tassel Earrings

I've got a SERIOUS thing for raffia fringe. Some of my favorite designers have produced raffia trimmed clutches, dresses and earrings but I don't have that kind of bankroll. I have an overwhelming arsenal of jewelry making supplies, so I went into my stash to create these AMAZING raffia tassel earrings and I'm sharing my steps with you. You can find all the materials at major craft stores and whip up several pairs of these bad boys in under an hour!

Make Raffia Tassel Earrings

 I like to start by gathering my potential materials and sketching out a rough plan of my design.

Make Raffia Tassel Earrings

Things You'll Need to Make Raffia Tassel Earrings

Scissors 
Set rhinestones with holes in the back
Decorative end jewelry pins
Assorted beads 

Here's How 

1. Make raffia tassels 


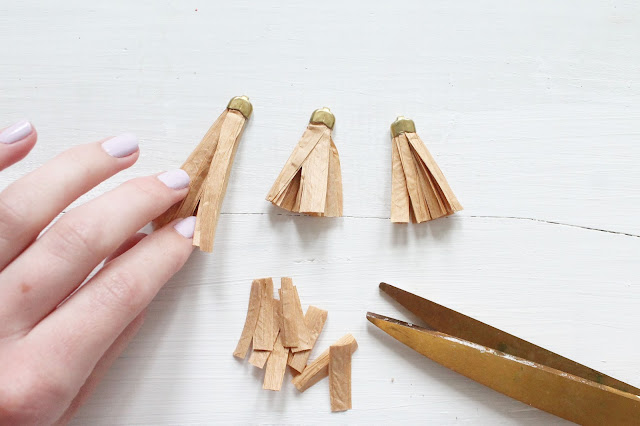
Each earring consists of three raffia tassels. Cut multiple pieces of raffia roughly 3" long. Fold each raffia piece in half and then fold lengthwise to create an end that can be easily glued into the tassel cap. Secure 4-5 raffia pieces into the cord cap with E6000 and allow to dry. 

Make Raffia Tassel Earrings

After your tassels have dried, trim the ends so that they're even. I made my tassels about 1" long.

Make Raffia Tassel Earrings

2. Make accent pieces

Wrap your accent beads on decorative eye pins leaving a small loop at the top. I chose small metallic tube beads.

Make Raffia Tassel Earrings

3. Assemble pieces 

String all of your components onto 20 gauge wire until satisfied with your pattern. Play around with the arrangement and colors of spacers to achieve different looks. 

Make Raffia Tassel Earrings

Trim the ends of the wire and glue into the side holes of the rhinestone setting. Wipe away any excess glue before it dries.

Make Raffia Tassel Earrings

4. Glue rhinestone to earring back 

Apply a dot of glue to the back of the rhinestone and press on the flat back earring post. Allow to dry flat before wearing.

Make Raffia Tassel Earrings


Make Raffia Tassel Earrings

I can't wait to wear these to my best friends wedding this week! Happy crafting--be sure to tag me on Instagram if you make a pair!

xo Lindsey Crafter

Make Raffia Tassel Earrings

This post includes affiliate links for your convenience at no extra cost to you. Thanks for keeping Lindsey Crafter craftin'. 

5.20.2016

Wedding Style

Wedding season is upon us! Get ready for outdoor soirees and chic sit-down dinners with a few of my favorite pieces for wedding attendees. Be sure to check out my gift guide to pick out the PERFECT present for the happy couple. 


what to wear to an outdoor wedding

3. Clutch
9. Sandals
10. Floral Push Pop Confetti

xo Lindsey Crafter

This post includes affiliate links at no extra cost to you and to keep Lindsey Crafter craftin'.

Star Studded Moccasins

Cute and comfortable flats are essential for my busy work week. My Kilty Softsoles are perfect for lounging around the house or pairing with jeans and a t-shirt for flea market trips. See how I jazzed mine up and made these Minnetonka mocs my own with a little craft magic! Follow the easy steps over on the Minnetonka Blog to create these astronomically inspired star studded moccasins.

What You’ll Need

10mm or 12mm Star Studs (approximately 56 studs for both shoes)
E600 Glue
Toothpicks
Flat Nose Pliers
Ruler
Pencil
Kilty Softsole Moccasins

Find complete steps here 


xo Lindsey Crafter 
This project was graciously sponsored by Minnetonka Moccasins. All ideas and content are my own. Thanks to the brands that keep Lindsey Crafter craftin'.

5.19.2016

Organize Your Bathroom with Colored Cork Canisters

When styling a kitchen or bathroom my first order of business is removing packaging and plastic bins and upgrading to clean glass jars. Organize your hotel soaps and loofahs into cork lid canisters so you can see what you have! Investing in shelf worthy storage means you don’t need to stow away your products under the sink. I've partnered with Me!Bath to share this easy DIY to add some color and organization to your bathroom--Have fun choosing accent colors to coordinate with the rest of your space!

Organize your bathroom with cork canisters

What You’ll Need

Cork Lid Canisters
Acrylic Paint
Medium sized paintbrushes
Thumbtacks
Clear Varnish

Organize your bathroom with cork canisters

1. Insert three thumbtacks into the base of the cork lid to keep the painted edges from sticking to your work surface.

Organize your bathroom with cork canisters

 2. Apply a thin coat of paint to the top and sides of the cork lid with a medium sized paint brush. Allow the paint to dry completely before applying a second coat if needed. After the top of your cork lid has dried remove thumbtacks and paint the bottom.

Organize your bathroom with cork canisters

Organize your bathroom with cork canisters

3. Protect your painted lids from moisture and wear by sealing them a coat of clear varnish.

Organize your bathroom with cork canisters

4. Fill your colorful canisters with your favorite Me! Bath Ice Cream Scoops and style near your
bathtub for easy access.

Organize your bathroom with cork canisters


All finished! Enjoy your clutter free countertops and relax in a nice bath with Me! Bath products
now available at Target.

xo Lindsey Crafter


This post was graciously sponsored by Me! Bath. All ideas and opinions are my own. Thanks to the brands that keep Lindsey Crafter craftin'. 


5.18.2016

Striped Taper Candles

I've always LOVED striped taper candles--just haven't loved the price tag. I decided to recreate the look myself, and after a little research found that you need a specific medium to help the paint stick to the wax. I found inexpensive tapers at my local dollar store, the clearance section of Michaels ( whoop .49 cents) and Flying Tiger in NYC. These bold stripes will look amazing on your table all summer long!

How to paint striped taper candles

What You'll Need 

Acrylic Paint 
Masking Tape (in various widths) 
Taper Candles
Candle Holders 
Paint Brushes
Q-Tips

How to paint striped taper candles

1. Tape off different widths of horizontal stripes to paint your candle. I found masking tape stuck better than painter's tape--be sure the ends of your tape overlap perfectly to get parallel stripes.

2. Mix equal parts of adhesion medium and acrylic paint. Paint stripes pulling away from the edge of the tape so as to not force paint under the seam. You will need several coats as the adhesion medium lessens the coverage. Remove the tape immediately after painting a section or the dried paint will pull off with the tape. Place tapers in candle holders while they dry. 

3. Touch up stripes with a skinny paintbrush or Q-tips and allow tapers to dry before adding to your tablescape!

How to paint striped taper candles

Things I Learned

Scoring along the edge of the tape with your nail or a knife will help you paint perfect stripe edges after removing the tape.

You HAVE to remove the tape before the paint dries or you will waste a lot of time touching up--My first batch was ruined because all of the paint pulled off with the tape. 

Chalk paint works GREAT--I got the best coverage and when burning the candle it just turns into ash.

Have you ever tried painting candles? Share your tips below! 

xo Lindsey Crafter

5.03.2016

The Best Guacamole Recipe Ever


The Best Guacamole Recipe


Did you know most guacamole recipes are missing one secret ingredient that TOTALLY makes it? You probably already even have it in your fridge...wait for it...itssssssssss Orange Juice. Ian won me over with his guacamole recipe and we finally got the ratios down on paper so we could share this recipe with you in time for Cinco De Mayo! You'll be scraping the bowl with a spoon when all the chips are gone! Here's the recipe:

The Best Guacamole Recipe

What you'll need to make the best guacamole ever :

Three large avocados
1/2 lime, juiced
1 tbsp orange juice (pulp free)
1/2 of a small red onion, diced
1/2 of a small habanero pepper, seeded and minced 
1-2 cloves of garlic, minced
1 tbsp cilantro, chopped
1 tsp salt (or to taste) 
ground black pepper to taste 

The Best Guacamole Recipe

Here's How 

1. Cut and pit avocados before mashing in a large mixing bowl with the lime and orange juice. 

2. Mix in chopped onion, habanero pepper, garlic and cilantro. 

3. Season with salt and pepper to taste and serve immediately with your favorite tortilla chips!

The Best Guacamole Recipe

YUM YUM YUM. (Had to really try not to eat all the prop chips before I got the shot.)

The Best Guacamole Recipe

Do you have a secret ingredient that makes your guac the bomb? Tell me below so I can try!
xoxo Lindsey Crafter (and resident chef Ian)

5.01.2016

Spring Style

I'm on the final leg of my MAJOR wardrobe purge (we're talking 100's of pounds of clothes and shoes) and really honing in on pieces I enjoy and wear on a weekly basis. A versatile capsule wardrobe is my goal-as well as finding fun everyday pieces to replace my worn out flats and purses. Here are some pieces I'm shopping myself--along with my favorite beauty products for daily maintenance. My new go-to gel color is OPI's "DON'T BOSSA NOVA ME AROUND"--the best opaque natural pink. Top off that fresh mani with a geode slice ring my favorite new jewelry designer  Elizabeth Huynh.

Spring fashion, accessories and beauty picks


What's an essential item for you during the cool transition from a snowy spring > sweltering summer? Comment and let us know below! 

xoxo Lindsey Crafter

This post may include some affiliate links for your convenience and to keep Lindsey Crafter going! 

Latest Instagrams

© LINDSEY CRAFTER . Design by Fearne.