

Last weekend I picked up the most DARLING wall mounted dollhouse at the flea market--for six bucks! Coincidentally I had just discovered Mandi's Dollhouse --a seriously inspiring modern take on a classic hobby -- so snatching it up and adopting another hobby was a no-brainer. After some initial research I discovered how pricey pre-fab dollhouse materials were -- YIKES. So a lot of the projects I'm going to tackle will involve serious improvisation and re-purposing items. After a run through the craft store I selected a few pieces just as "filler" items while I do major construction on the floors and facade of the house. See how I transformed a plain metal chair into a fluffy felt lounge below!
Here's my inspiration for the interior of my dollhouse "remodel". I've found planning out the rooms of this mini dream home TOTALLY satisfies my need to flip a real house (HA). There's still some serious cleaning, sanding and window installation to complete--but I'm looking forward to sharing the entire process with you and hopefully encouraging you to try building one of your own!

1. Camille Styles // 2. A Beautiful Mess // 3. Rue Mag // 4. Centsational Girl // 5. Contemporary Tiles 6. My Scandinavian Home
Here's how I turned an a plain metal lawn chair into a chic felted lounge chair!
You'll Need:
Felt Sheet
Scissors
Hot Glue Gun
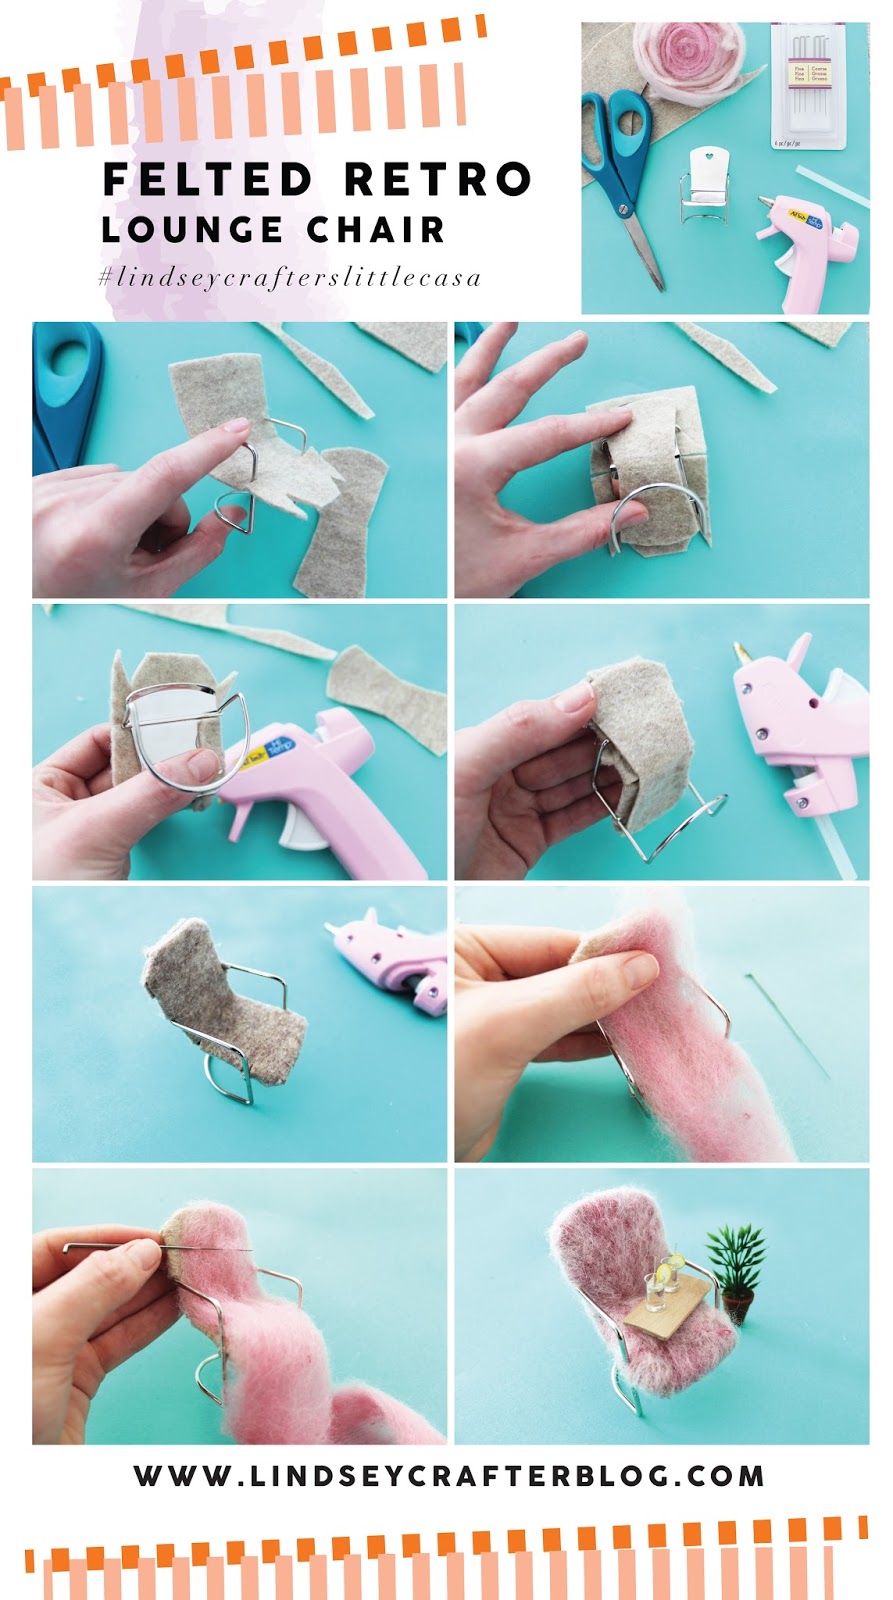
1. Upholstering your metal chair in inexpensive sheet felt will make felting the cushions SUPER easy. Cut sheet felt to fit over the seat and back of the chair leaving at least a 1/2 inch extra on all sides. Snip the felt to fit around the metal arms and legs to create tabs to easily glue down felt to the back of the chair. Cut a second piece for the back of the chair to cover the tabs and exposed metal.
2. Glue down the felt pieces to the chair with small dots of hot glue. Trim off any excess felt.
3. Choose a color of wool felt roving and use felting needles to shape the wool into the cushions of the chair. Poke the wool fibers into the sheet felt with the needle--hold it parallel to the surface you're felting to keep the needle from snapping off. Here's a great intro to felting by Living Felt
4. After covering the entire seat with wool roving use diluted dish soap and running water to agitate the fibers with your fingers and create a more matted felt. Rinse out all dish soap and dry thoroughly with a dish towel-- I sat my chair in the sun to dry completely.
5. Style your finished chair with your favorite mini accessories! I found these darling glasses of lemonade at Michaels!
Follow my Grown Up Dollhouse Pinterest board to keep
up with the reno and see my favorite eBay and etsy sources for vintage dollhouse furniture and accessories.
xo Lindsey Crafter
This post includes affiliate links for your convenience and to keep Lindsey craftin'


'wow' it's really amazing. looking so beautiful. i wish this chair is comfortable for any user. it's a gaming chair. actually after seeing that i feels to need that. chair for gamers
ReplyDelete